Legacy Products

Records custodial interviews and interrogations for law enforcement services and child advocacy centers.

Records city and town councils or assemblies, where minutes are saved in Microsoft Word.
Dictation Buddy and Transcription Buddy
This page provides information and links about using Dictation Buddy and Transcription Buddy and how to obtain, evaluate and purchase the programs and optional foot pedals.
Two different editions are available. These include:
- Transcription Buddy plays pre-recorded audio files and allows you to listen and control the playback, while at the same time, transcribing the audio into another PC application like Microsoft Word. An optional foot pedal is available to control the playback.
- Dictation Buddy has all of the playback features of Transcription Buddy, including support for an optional foot pedal, but also includes the ability to record audio from a microphone on the PC's mic input jack.
System requirements: 32-bit or 64-bit version of Microsoft Windows XP, Windows Vista, or Windows 7, 8, 10; sound card.
Before you purchase a foot pedal bundle, you should read this information about using a foot pedal.
The purchase price for any of the "bundled" systems includes ground shipping anywhere in North America. Although the shipment will probably arrive within 4 business days, exact shipping times cannot be guaranteed.
You may download, install and evaluate Dictation Buddy and/or Transcription Buddy, at no cost, for one month. Evaluation copies are available for download by clicking any of the following links. Evaluation copies are fully functional versions of the program, with the exception that the program will expire after 30 days. If you already have an Infinity USB foot pedal, it will work with the evaluation software. For ongoing use of the product, you must purchase a software license.
Self-extracting files:
Zip Files:
- Dictation Buddy v4.0 Build 50 (zip file)
- Transcription Buddy v4.0 Build 50 (zip file)
Purchase Dictation Buddy License(s)
Users of previous versions of Dictation Buddy and of Transcription Buddy Recorder Edition, may follow this link to purchase an upgrade to Dictation Buddy V4.0 at a discount price of $25.00.
Purchase Transcription Buddy License(s)
Transcription Buddy Player Edition users, may follow this link to purchase an upgrade to Transcription Buddy V4.0 at a discount price of $20.00.
* All bundle pricing includes shipping costs within North America. Although the shipment will probably arrive within 4 business days, exact shipping times cannot be guaranteed.
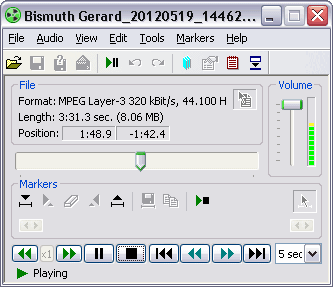
Both Dictation Buddy and Transcription Buddy provide a complete range of playback controls for transcribing audio on a PC. When transcribing, the programs allow a text editing program, such as Microsoft Word, to remain the active program, during playback. This allows the user to type, at the same time that the recording is played back. Additionally, playback functions such as Pause, Resume, and Rewind, may also be used, without the user getting out of the text edit program.
VEC Infinity USB Foot Pedal Support
The programs support foot pedal control of the playback functions through a USB connected foot pedal. To access the foot control options, go to View=>Options=>Foot Control. In order to use foot pedal support, you must enable this function, by checking the "Enable foot control" box in this Window. You must also have a USB port foot pedal.
Transcription Buddy and Dictation Buddy support the VEC Infinity foot pedal from VEC Electronics. If you already have an Infinity pedal, you may use it with Dictation Buddy or Transcription Buddy.
Users may customize the foot pedal controls according to their individual requirements. The pedals have a 3-pedal configuration. A large, center pedal is used to Play / Pause the playback. Depress the pedal to cause playback to begin. Release the pedal, and playback will stop. Optionally, the playback can Step-Back on pause, so the typist has a moment to determine where they are in the recording.
The left pedal can either Rewind the recording at a previously specified speed, or jump the recording back, a specified number of seconds. The right pedal can either FF the recording at a previously specified speed, or jump the recording forward, a specified number of seconds.
Hot-key Support
The programs also supports Hot-keys to control playback. With hot-keys, a person can control playback at the same time that they type text into their word processor.
Prior to using the hot-key function, it must be enabled. To enable this function, go to View==>Options==>Hot-keys==>Enable Hot Keys. Once you have Applied this change, the default hot-keys will become active. The default hot-keys include:
|
Function |
Default Hot key |
|
Play |
Ctrl + Alt + P |
|
Pause/Resume |
Ctrl + Alt + U |
|
Stop |
Ctrl + Alt + T |
|
Jump Back* |
Alt + Page Down |
|
Jump Forward* |
Alt + Page Up |
|
Jump to Beginning |
Alt + Home |
|
Jump to End |
Alt + End |
|
Minimize/Restore |
Ctrl + Alt + F10 |
|
Record |
Ctrl + Alt + R |
|
Decrease Play Speed |
Ctrl + Alt + D |
|
Normal Play Speed |
Ctrl + Alt + N |
|
Increase Play Speed |
Ctrl + Alt + I |
|
New Bookmark |
Ctrl + Alt + F2 |
|
AutoPause Parameters |
Ctrl + Alt + Q |
*the jump back (rewind) and jump forward (FF) options are modified by the Step Value option that can be found on the main menu Window.
The keystrokes associated with the various playback controls, may be modified by the user. Use the View=>Options=>Hotkeys parameter box to alter the keystrokes.
Once the hot-key function has been activated and the appropriate hot-keys selected, the user may begin working with the program and a word processing program, such as Microsoft Word. To begin transcription, the user should:
- Open our program and select an audio file to transcribe,
- Minimize our program so it doesn't take up space on the desktop,
- Start your word processing application, Microsoft Word for example
- Type Ctrl+Alt+P to begin playback
- Type Ctrl+Alt+U to pause and then resume playback
Play / Pause / Play Feature
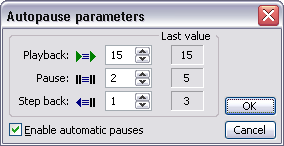
The Play / Pause / Play feature that allows a user to play a recording and have the playback intermittently pause. This feature allows the typist to periodically catch up to the playback. This feature has three associated parameters. The Playback Duration parameter indicates how long playback should continue, prior to the occurrence of a Pause. The Size of Pause parameter indicates the duration of each pause. The Step Back parameter causes play to begin some seconds prior to the point at which it stopped. All of these parameters are specified in seconds. These parameters are set in the following Window. In this example, Play Duration is set to 15 seconds, the Size of Pause is 2 seconds and the Step Back is set to 1 second.
To set these parameters, go to View => Options => Playback or to Audio => Auto Pause Parameters. To start this mode of Playback, click the Auto Pauses button on the toolbar, or go to the Audio pull down menu and select Automatic Pauses.
Additional Transcription Features
Variable Speed Playback with Automatic Pitch Control
The ability to vary the speed at which playback occurs. The software will automatically adjust the pitch associated with the altered speed, to eliminate the high-pitched tones usually associated with advanced play-back speeds. Once a file has begun playing, the Play button changes to a speed button as illustrated here:  . As either the double left or double right arrows are clicked, the speed is altered according to the Speed Settings in the View => Options => Playback Window settings. Hot Keys are also available to alter the playback speed. See View => Options => Hotkeys for more information about the Hotkeys controlling playback speed.
Audio File Compression Support
The programs can playback many types of audio files. Supported audio files are: RIFF-WAV (compressed and uncompressed); MP3; WMA; Olympus DSS (with restrictions); Dialogic VOX; BCB TrueSpeech. Follow this link for more information about compressed audio files.
Always On Top
This feature places the application window on top of other windows on your desktop. The window will never be "behind" other applications and it will always be seen. Go to the View pull down menu and select Always on Top to activate this feature.
Thin View
This feature presents a very small Buddy Window that will only use a small portion of the available desktop space. This view has only the most important controls and information. You can enter into Thin View by clicking the Thin View icon  on the application taskbar, or you can go to the View pull down menu and select Thin View. You can drag the thin view around on your desktop, by clicking on the first icon on the display.
The view will look like this Window.

Use the expand icon to return to full view.
Auto Stepback on Pause
There are three separate "Step-Back" options within the program. When used with a pause, each of these settings causes the current point of playback to be reset. This feature allows the last few seconds of the recording to be replayed, so the transcriptionist can "find their place" and resume typing.
- One Step-Back setting is used with a foot pedal. When the "play" pedal is released, and the playback is paused, the playback position may be reset to begin playback from just prior to where the playback stopped. The setting for this parameter can be found in the Window with the other settings for the pedal functions. See View => Options => Foot Control => Set Pedal Functions to set this amount of time to Step-Back.
- Another Step-Back setting is associated with the Play-Pause-Play facility. This automatic facility allows the playback to continually play and pause. The Step-Back setting associated with this feature can be found on the same Window as other Play-Pause-Play settings. See Audio => AutoPause Parameters to set this Step-Back parameter.
- The final Step-Back parameter is associated with the Pause setting that is available on the primary Window. Set this Step-Back parameter on the View => Options => Playback Window.
Imbedded Bookmarks
The Buddy programs have the ability to imbed bookmarks within a sound file, to allow for comments and allow for easy access of specific points within the file.
File Notes
The programs support imbedding file notes within an audio file. The notes may be accessed by clicking on the File Notes icon ![]() , on the Main Window toolbar. When accessed, the text notes may be added, updated or deleted using the text edit window that becomes active.
, on the Main Window toolbar. When accessed, the text notes may be added, updated or deleted using the text edit window that becomes active.
Opening the Bookmark Interface Window
The programs support imbedded bookmarks and associated text notes. This support is provided through an additional Window, used to enter, update and delete the bookmark entries. The Bookmark Window can be opened by clicking on the bookmark icon ![]() , on the primary toolbar. The Bookmark Window can also be opened by using the Alt+F2 keys on the keyboard. Once opened, the Bookmark Window may be resized, according to user requirements.
, on the primary toolbar. The Bookmark Window can also be opened by using the Alt+F2 keys on the keyboard. Once opened, the Bookmark Window may be resized, according to user requirements.
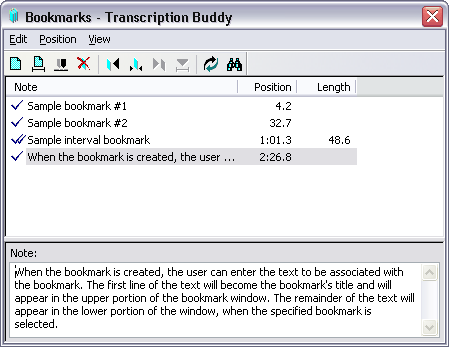
Bookmark Window Interface
The Bookmark Window feature supports the insertion of bookmarks "on-the-fly" as the recording is being made as well as after the recording has been completed. The top portion of the Bookmark Window displays all of the bookmarks within the file. The first line of the bookmark's associated text notes is displayed as well as the bookmark's position within the file. The complete text for the "selected" bookmark is displayed in the lower portion of the window. According to the ![]() scroll parameter setting, bookmarks can automatically scroll through the entries or alternatively, the user may choose to remain at one bookmark entry, throughout audio playback.
scroll parameter setting, bookmarks can automatically scroll through the entries or alternatively, the user may choose to remain at one bookmark entry, throughout audio playback.
Entering a Positional Bookmark
A Positional Bookmark is associated with a specific point within the sound file. To create a positional bookmark, the user clicks on the Create Bookmark icon ![]() , found on the Bookmark Window toolbar. The user can also create a positional bookmark by using the F2 function key. Positional bookmarks can be created during the recording process or subsequent to the completion of recording.
, found on the Bookmark Window toolbar. The user can also create a positional bookmark by using the F2 function key. Positional bookmarks can be created during the recording process or subsequent to the completion of recording.
When the bookmark is created, the user can enter the text to be associated with the bookmark. The first line of the text will become the bookmark's title and will appear in the upper portion of the bookmark window. The remainder of the text will appear in the lower portion of the window, when the specified bookmark is selected.
Entering an Interval Bookmark
An Interval Bookmark is one that pertains to an interval or fragment of the wav file. To define an Interval Bookmark, the user must first mark the beginning and the end of the interval. Use the Markers icons on the Primary Window to mark both the beginning and the end of the Interval Bookmark. Once the interval is marked, create an Interval Bookmark by using the interval bookmark icon ![]() .
.
A double check in the bookmarks display of the Bookmark Window distinguishes an interval bookmark from a positional bookmark.
File Notes
The programs support imbedding file notes within an audio file. The notes may be accessed by clicking on the File Notes icon ![]() , on the Main Window toolbar. When accessed, the text notes may be added, updated or deleted using the text edit window that becomes active.
, on the Main Window toolbar. When accessed, the text notes may be added, updated or deleted using the text edit window that becomes active.
Opening the Bookmark Interface Window
The programs support imbedded bookmarks and associated text notes. This support is provided through an additional Window, used to enter, update and delete the bookmark entries. The Bookmark Window can be opened by clicking on the bookmark icon ![]() , on the primary toolbar. The Bookmark Window can also be opened by using the Alt+F2 keys on the keyboard. Once opened, the Bookmark Window may be resized, according to user requirements.
, on the primary toolbar. The Bookmark Window can also be opened by using the Alt+F2 keys on the keyboard. Once opened, the Bookmark Window may be resized, according to user requirements.
Bookmark Window Interface
The Bookmark Window feature supports the insertion of bookmarks "on-the-fly" as the recording is being made as well as after the recording has been completed. The top portion of the Bookmark Window displays all of the bookmarks within the file. The first line of the bookmark's associated text notes is displayed as well as the bookmark's position within the file. The complete text for the "selected" bookmark is displayed in the lower portion of the window. According to the ![]() scroll parameter setting, bookmarks can automatically scroll through the entries or alternatively, the user may choose to remain at one bookmark entry, throughout audio playback.
scroll parameter setting, bookmarks can automatically scroll through the entries or alternatively, the user may choose to remain at one bookmark entry, throughout audio playback.
Entering a Positional Bookmark
A Positional Bookmark is associated with a specific point within the sound file. To create a positional bookmark, the user clicks on the Create Bookmark icon ![]() , found on the Bookmark Window toolbar. The user can also create a positional bookmark by using the F2 function key.
, found on the Bookmark Window toolbar. The user can also create a positional bookmark by using the F2 function key.
Positional bookmarks can be created during the recording process or subsequent to the completion of recording.
When the bookmark is created, the user can enter the text to be associated with the bookmark. The first line of the text will become the bookmark's title and will appear in the upper portion of the bookmark window. The remainder of the text will appear in the lower portion of the window, when the specified bookmark is selected.
Entering an Interval Bookmark
An Interval Bookmark is one that pertains to an interval or fragment of the wav file. To define an Interval Bookmark, the user must first mark the beginning and the end of the interval. Use the Markers icons on the Primary Window to mark both the beginning and the end of the Interval Bookmark. Once the interval is marked, create an Interval Bookmark by using the interval bookmark icon ![]() .
.
A double check in the bookmarks display of the Bookmark Window distinguishes an interval bookmark from a positional bookmark.
Dictation Buddy and Transcription Buddy can playback many types of audio files. Supported audio files are: RIFF-WAV (compressed and uncompressed); MP3; WMA; Olympus DSS (with restrictions); Dialogic VOX; BCB TrueSpeech.
Notes to implement DSS file support: You must install the Olympus Player Pro software from the CD that came with your Olympus recorder. Alternatively, you can try to copy a file called DSSCORE.DLL into the Buddy program install folder. This DSSCORE.DLL file is distributed with Olympus software. The described procedure works for Olympus software containing older versions of DSSCORE.DLL (below version 5.1.0.35); with newer versions of the DSSCORE.DLL, support of DSS files may fail to work.
Both Dictation Buddy and Transcription Buddy can also play wav files that have been compressed with an audio codec (like Truespeech, or ADPCM), installed in your system.
Dictation Buddy and Transcription Buddy also support Dialogic Vox (.vox) file playback and BCB Truespeech files. The BCB Truespeech files do not have a specific extension. BCB Truespeech files are also known as PlayAll files. Please see the Help facility for more information about these file formats.
|
Format |
Attributes |
MB / Hour |
Application |
|
DSP Truespeech |
8.0kHz, 8bit, mono |
4 |
Dictation |
|
MS ADPCM |
8.0kHz, 4bit, mono |
14 |
Talk Radio and meetings |
|
MP3 |
11.5kHz, 16kBit/s, mono |
4.5 |
Internet audio |
|
PCM |
44.1kHz, 16bit, stereo |
600 |
High quality recordings |
DSP Group Truespeech
The DSP Group Truespeech CODEC was written by DSP Group of Santa Clara California. This compression method was written specifically to address the requirement of recording human speech. This method removes a considerable portion of the potential sound spectrum. However, the removed data has little impact on a listener's ability to understand what was said. The algorithm "rounds off" many of the highs and lows associated with the tones found in the original spoken words. Listeners may no longer detect some of the emotions that may have been implied by these tones, but the actual words will remain quite clear and discernable.
This CODEC is an excellent choice for recording dictation. The CODEC supports a Sample Rate of 8.0 kHz with a Sample Size of 8 bits and mono recording. One hour of Truespeech recording can fit into about 4.5mb of disk space. We suggest the use of Truespeech for Dictation type applications where the speaker's emotions are irrelevant.
Microsoft ADPCM
The Microsoft ADPCM CODEC provides a middle ground for audio recording. This CODEC retains much of the audio spectrum, while at the same time, providing a good level of compression. The algorithm will reproduce most of the tones that were present in the original spoken words. We suggest the Microsoft ADPCM CODEC for high quality telephone recording or for recordings of meetings or conversations where capturing the emotions behind the words is also important. This CODEC is ideal for talk show Internet broadcasts.
The Microsoft ADPCM CODEC offers Sample Rates from 8.0 kHz to 44.1 kHz. All Sample Sizes are 8 bits and the sounds may be captured in either mono or stereo.
MPEG Layer - 3
This CODEC is applicable for recording speech and music of various qualities.
PCM
PCM is a completely uncompressed sound format. Because it is uncompressed, there is no loss of quality due to the deletion of data. This format is best used when the size of the file is not an issue. For example, this would be the case if the file was to be quickly moved to CD.
Dictation Buddy can be used to record from other devices such as a cassette recorder, a dictaphone or any audio output device. Recordings may be made from either the mic or line-in jacks on the PC's sound card (View==>Options==>Recording==>Input Line). Most recording devices provide an output jack for an earphone or a headset. In order to re-record from another device, you should obtain a cable that can connect your sound output device to the sound card on your PC. The jack at one end of this cable must fit the earphone / headset jack on the sound output device. The other end of the cable, must fit the mic or line-in of your PC's sound card. You can probably obtain such a device from any local electronics store.
Connect the earphone / headset output jack to the mic or line-in using the cable. You may now begin to record, by clicking the Dictation Buddy Record button. The mic and line-in ports each expect slightly different types of audio sound. Try each of these jacks to determine which works best with your other recording equipment. Don't forget to set the Dictation Buddy options to the appropriate input jack (View==>Options==>Recording==>Input Line).
Dictation Buddy may also be used with conference table microphones to record board meetings, depositions or court proceedings directly to a wav file on a PC. High Criteria offers the CM-3 Microphone for such applications.
The CM-3 microphone was specifically designed for meeting room recording. With the CM-3, there is no need to pass a microphone around or to miss out on faint voices during play-back of the meeting recordings. The CM-3 plugs directly into a PC's sound card. And with it's unique ability to daisy-chain multiple microphones together, even the longest conference table can be adequately covered to record all parties present.
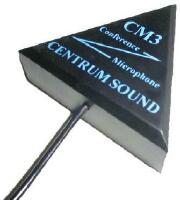
The CM-3 has a dense body composition combined with large rubber feet to prevent skidding on any surface and reduces the annoying mechanical noises usually associated with conference arrangements. The CM-3 is a so-called "boundary type" microphone, where the hard reflective surface (the conference table) constitutes the boundary. Taking advantage of the natural boundaries has resulted in a small compact design with it's main body fitting in the palm of a hand. For additional intelligibility, the microphone was designed to provide a smooth boost in the frequencies around 3 kHz.
Dictation Buddy and the CM-3 microphone are the ideal combination for recording:
- Board Meetings
- Depositions
- Court Proceedings
Both Transcription Buddy and Dictation Buddy support the Infinity USB foot pedal from VEC Electronics.
Purchase the VEC Infinity USB Foot Control here.
Ground shipping is included in the purchase price for deliveries within the lower 48 states and Canada. Shipments typically arrive within 4 business days, but exact delivery times cannot be guaranteed.
Please note: the foot pedal alone does not play back audio files, and playback software is not included with purchase. A compatible playback application must be obtained separately and installed. The computer must also have a standard sound card and an available USB port.
The Infinity foot pedal is compatible with Windows 98SE, Me, 2000, XP, Vista, 7, and 10. It also works with Apple Mac computers running macOS 10.9 or later.
Infinity Pedal from VEC Electronics
Users of Dictation Buddy v4.0 and Transcription Buddy v4.0 and above should enable the foot control support in the programs by plugging the pedal into the PC and then going to View => Options => Foot Control and checking the Enable Foot Control checkbox. You can then use the Foot Control Wizard to confirm the pedals on the control. You may also alter pedal functions on the Set Pedal Functions Window.
Users of Transcription Buddy, prior to V4.0 may also use the the Infinity foot pedal but must download this .dll file and save it into the same folder as Transcription Buddy is installed. By default, the folder will be: c:\Program Files\HighCriteria\TranscriptionBuddyRE or TranscriptionBuddyPE. Once you have downloaded and saved this .dll file to the appropriate folder, you should proceed with the General USB Support Steps, as outlined below. Note that Dictation Buddy only began supporting the Infinity foot pedal under version 4.0. Previous versions of Dictation Buddy did not support the Infinity pedal.
General USB Support Steps
- Your first step should be to plug the foot pedal into the USB port. Windows should immediately report that New Hardware has been found.
- Windows will automatically add the appropriate drivers. There is no need to download and install special drivers or another software.
You have now successfully installed the foot pedal. You must now enable support for the pedal in the program configuration. Go to View => Options => Foot Control and check the Enable Foot Control checkbox. You should then use the Foot Control Wizard to confirm the pedals on the control. You may also alter pedal functions on the Set Pedal Functions Window.
The steps described above are also valid for other USB pedals supported by Transcription Buddy and Dictation Buddy (Olympus R23/24 Foot Switch and VPEDAL).
Using Dictation Buddy or Transcription Buddy
- Can I control playback and keep my text editing application, like Microsoft Word, as the working application on the top of my desktop?
- Yes! Both Dictation Buddy and Transcription Buddy can assign Hot Keys to control playback functions, like Play / Pause / Rewind / FF / Speed-up playback and Slow-down playback, all through your keyboard. Alternatively, you can use a foot pedal to control playback functions. If you already own a VEC Infinity USB pedal from VEC Electronics, then you can use this pedal with Dictation Buddy or Transcription Buddy. If you don't already own a pedal, you can purchase one from us.
- My USB foot pedal is connected to my PC, but Dictation Buddy or Transcription Buddy does not see it and I cannot use it.
- Please see this page for details about installing USB foot pedal support.
- Where can I get a foot pedal for my PC that works with Dictation Buddy or Transcription Buddy?
- Both programs work with the Infinity USB pedal from VEC Electronics. If you already have this type of pedal, then you can use it with either program. We suggest you download the evaluation version of the program and give it a try! If you do not already have a pedal, you can purchase an Infinity foot pedal along with the software, from us.
- I have an Olympus R23/24 foot pedal, but I want to use the COM port connection, instead of the USB connection. Is this possible?
- Yes. The Olympus foot pedal comes with a small adaptor that allows its use in either a USB port or a COM port. To use the pedal with the COM port adaptor, first download and execute this program. Then shut down your PC and plug the pedal into the COM port. Then re-start your PC. You should have your Windows install CD when you re-start the PC. You should now be able to activate the foot pedal.
- How do I activate a foot pedal?
- First, plug the foot pedal device into either the USB or game port of your PC. Then, go to View=>Options=>Foot Control and check the box labeled "Enable Foot Control".
- How do I activate the Hot key function?
- Go to View=>Options=>Hot Keys and check the box labelled "Enable Hot Keys".
- When I try and play a DSS file, the program cannot see the file. What must I do to play a DSS file?
- You must install the Olympus Player Pro software from the CD that came with your Olympus recorder. Alternatively, you can try to copy a file called DSSCORE.DLL into the Buddy program install folder. This DSSCORE.DLL file is distributed with Olympus software.
- The above procedure should work for Olympus software containing older versions of DSSCORE.DLL (below version 5.1.0.35); with newer versions of the DSSCORE.DLL, support of DSS files may fail to work.
- Can Dictation Buddy or Transcription Buddy playback at speeds that are faster and/or slower than normal playback speed? If so, how?
- Yes! The program can playback a recording at a faster rate or a slower rate than normal. The speed-up and slow-down functions may be accessed either through the keyboard with Hot Keys or with a mouse.
- When you start playback, you will see double arrows pointing left and right, just below the "Length indicator" (this is in the lower left corner of the main Window.). These arrows control playback speed. To slow down the playback, click on the arrows going left. To speed up playback, click on the arrows going right. Please note that these arrows only appear during playback. You can also control this function through the keyboard. Please see View => Options => Hotkeys for more information about using the keyboard to control the playback speed.
- Each click of the arrow will cause playback speed to be reduced or incremented by a step speed. With this control, you can go down to 1/2 normal speed or increase the speed to double the normal speed. The size of the incremental steps is specified under View => Options => Playback. More information about this topic can be found in the Help Topics facility under Using the program => Playback => Playback with different speeds.
- I would like to use the Hot keys to control the Buddy program, but the default Hot keys conflict with my text editing application. Can I change these defaults?
- Yes! Just go to View=>Options=>Hot Keys. Select the function you want to change, "Clear" the key, then press the new key that you would like to substitute for this Hot key.
- What is the difference between Dictation Buddy and Transcription Buddy?
- Dictation Buddy allows a user to record audio files (for example, from the microphone or line-in inputs of a sound card, or from a USB microphone). Transcription Buddy only allows the playback of audio files. It does not allow users to record audio files.
- How big are the sound files recorded by Dictation Buddy?
- The size of the file depends how much dictation is in the file and what type of compression is used on the file. By default, Dictation Buddy is set to use MS-ADPCM compression. This type of compression gives a good quality recording with moderate compression. If you want even more compression, we suggest that you use DSP Group Truespeech. Truespeech compression was written specifically for dictation applications and gives an excellent level of compression. To change the type of compression, go to View=>Options=>Recording=>Sound Quality=> Change.
- How can I move the recorded files around the Internet?
- Generally, wav files will be too large to attach to an email. An alternative is to set up your own File Transfer Protocol (FTP) site. There are also a number of FTP sites on the Internet that provide free or paid space on their FTP sites.
- I already have my recording on a tape device. How can I copy this recording to my PC?
- You can use Dictation Buddy and a cable that you can get from your local electronics store. See this page for details.
Installing Dictation Buddy or Transcription Buddy
- What version of Windows do I need to run the programs?
- The programs will run on 32-bit or 64-bit versions of Microsoft Windows XP, Windows Vista, or Windows 7. Your PC must also have a sound card.
- I have a previous version of the programs installed. Should I uninstall it before installing my new program?
- No. There is no need to uninstall a previous version of the program.
- My hard disk crashed and I lost everything including the Buddy program. How can I get another copy?
- You can always download the latest version from our web site at www.transcriptionbuddy.com. We recommend you keep a paper copy of your registration key and keep it in a safe place. If you have lost your key, use //www.highcriteria.net/scripts/getkey/getkey.asp to obtain a registration key. This form can be used only if your E-mail address that we have in our database is still valid. If this is not the case, E-mail us at support@highcriteria.com and provide your registration name, the old address and the new address, and we will update our records.
Purchasing Our Programs
- The evaluation versions of the Buddy programs seem to work fine. Why do I have to purchase anything?
- The evaluation version of the program will only work for one month. The program is not free and you must purchase a registration if you are going to continue to use it.
- What happens when I make a purchase online?
- A charge for the appropriate amount is placed on your credit card by our credit card processing company, either Internet Secure or ShareIt. We will then send you two emails. One email is simply a receipt. The other email is your registration information. Your registration information is a code that you must copy and paste into two text boxes in the Buddy application. Complete instructions come with the email.
- This entire process should take about 10 minutes, from the time you make your purchase, until you copy and paste the registration information into the Buddy program. If you also ordered the optional foot pedal, then we'll send it to you by ground courier and you should have it in a week.
- We send you your registration information by email, so it is very important to specify your email address correctly, in the purchase order form.
- How long does it take to get a registration key?
- If you register by credit card, it takes only minutes. Your registration code is automatically emailed to you as soon as your credit card has been verified.
- My credit card transaction was approved but I didn’t get a receipt and/or a registration key. What should I do?
- This is likely caused by a typing error in your E-mail address, or possibly due to some technical problems with network communications. E-mail support@highcriteria.com and we will resend the missing information to you. Make sure that your E-mail address is not blocked and that you can accept E-mail from us.
- I am trying to register but receive a message that the transaction is “Voided”. What does this mean?
- It means the postal address you provided is different from that of your credit card billing address. Please correct the address and try again. If in doubt, look at your credit card statement for verification. If there is still a problem, use the alternative credit card link.
- My credit card is valid and has sufficient credit but your Website keeps declining it. What can I do?
- The best way to resolve this is to call your bank. They have records of all your transactions and may be able to quickly determine the reason for failure. You can also try the alternative credit card link.